OL 333 Assignment Eight Homework
Online Learning: Online Learning: OL 333 Climate Smart Agriculture.
Center for Sustainable Development.
https://csd-i.org/ol-333-climate-smart-agricult/
This week’s resources:
Assignment Eight Discussion
Magee Example Project Assignment Eight
Assignment Eight. Leading a participatory workshop in a climate smart agricultural technique
Part one.
The first thing to do for your workshop is to make sure that you are well-prepared. That you have people to meet with, you have a place to hold a workshop, and you have the materials that you will need.
If you’ve decided to offer snacks or a nutritious luncheon, you have already chosen recipes and have a plan for purchasing the food and putting someone in charge of preparing it so that you aren’t distracted from facilitating the workshop. You also have cups or glasses, tea and water, plates and cutlery, napkins, and a way to clean up at the end.
If you arranged the workshop for Saturday, then you still have this week to fine tune the details.
The past workshops that you’ve given have mostly been for gathering information in a participatory manner. This will be your first workshop actually teaching the community how to do something physical that they are hoping to adopt and to do on their own in their own farm fields.
I would suggest going a few hours early just to make sure everything is in order. For example, my workshop is going to be on soil restoration and conservation for smallholder farmers. In the workshop I’m going to give them a demonstration on the positive impact of mulching soil—which requires setting up a small demonstration plot in advance. I’m also going to have a display of different kinds of organic material that can be found in and around the community—so I need to make sure that that’s carefully organized and labeled (I also need to make sure that it showed up!).
We’re also going to build a compost pile—so I need to make sure that the space is ready, the materials are there on the spot, and that the appropriate tools are there too.
And, we’re going to talk about incorporating organic material into their farm fields soil—and give a simple demonstration—and also discuss and show how to apply mulch to fields that have recently been planted. I need to make sure that the demonstration plot is ready, and that the materials and tools are there for planting and mulching.
Although I have a contact point person in the community who is agreed to help me with these things, they haven’t necessarily organized and facilitated a workshop—so they can’t anticipate little challenges that might come up if things aren’t well organized. The community is a 3 to 4 hour drive away. Consequently, if this workshop is meant to start at eight o’clock in the morning it would be worth my while to arrive the afternoon before to get everything in order—and consider spending the night. If the workshop is meant to start at 9:00 in the morning, I might need to spend the night in the community and show up at the site by 7:00 in the morning to make sure everything is set up
Part two.
Hopefully you brought colleagues to help you facilitate the workshop—especially if you break it into groups (of men and of women, or of teenagers and of parents).
The lesson plan that you adapted for leading the workshop from one of your other lesson plans will be very helpful in both the preparation in advance (because it suggests materials that you will need) but it also tells you what to do at each stage of the exercises so that you can stay on track. Your how-to cards will also be extremely helpful as handouts. Sometimes I’ll make four posters in advance to help in explaining the different demonstrations—and then replicate those drawings onto an 8 1/2 x 11 sheet of paper as the handout. This way your sketches can both help you in your explanations, and the participants can also have something to refresh their memory or week or two later.
It’s good to begin the workshop with an icebreaker (sing a song or play a game) and introductions around the room. We want to make sure that everyone is comfortable being there, that they feel safe enough to say what’s on their mind, and that there is a certain amount of enthusiasm in the room in order to encourage participation.
Take notes throughout the day right onto the lesson plan to remind you about things that went well, things that didn’t go well, and how long the different segments took. For example, you might find that the workshop only took four hours to do rather than the six hours you estimated.
Large sheets of paper and markers are also a great way to take notes. As your community members say interesting things you can jot them down on these large sheets of paper and use them later as reminders of what was said, what people’s reactions were, and what was and wasn’t working. This information will create a good baseline of where the community is now—that you can use for a comparison when the project finishes in 2 years.
I know that you will be tired at the end of the day but I would take a few minutes when you get home to go through the lesson plan and make a few more notes. The next time you give this workshop or when one of your colleagues wants to give this workshop you can clean up the lesson plan to reflect what really happened. Even a year from now your notes will be very useful.
I would also recommend meeting with your team the next day to get their perceptions of how the workshop went and if any improvements could be made the next time that you give it.
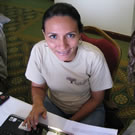
Be sure to take photographs. You should get your volunteer helpers to take photographs of you as well. Be sure to take:
- some close-up detailed shots of some of the participants,
- close-up detailed shots of the materials that you use
- interesting drawings that you might have done in your large sheets of paper
- take a couple of shots of the whole group
- take careful shots of the notes on the large pieces of paper that you made
- photos of you in action—both in front of the group and close-upsof you with individuals
- don’t take too many long distance shots because it’s difficult to understand what they’re about
- don’t take pictures of the back of people looking at something—take pictures of the front of people looking at something
I would suggest that you read our newsletter on taking photographs:
https://nonprofit.csd-i.org/field-guide-capturing-compelling-photos-from-the-field/
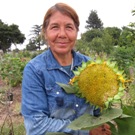
One of the biggest challenges that I see with nonprofits is a shortage of good quality photographs. Get close-ups of people so that they fill the frame of the photograph. Make sure they’re smiling and looking at you. Make sure the lighting is good and that the photograph is in focus. If you’re taking photographs outside where there’s lots of glare, use your flash—it will balance out the glare. Look at the photograph of the woman with the green banana plant to see what I mean. Take close-up pictures of people doing things—action shots. Take pictures of people doing the exercises in the workshop—such as drawing the map of the community or filling in the calendar—get right in there up close to take the photograph.
When you’re composing your photograph make sure that there are not a lot of busy things happening in the background to distract from your subject. Please consider reading through the newsletter. If we decide to feature your project in one of our newsletters—one of the criteria in our decision-making process about who we feature is in the quality of the photographs they send us.
Here are some examples:
;) |
 |
;) |
;) |
;) |
;) |
 |
;) |
;) |
;) |
;) |
;) |
See Chris Enn’s photos of his conservation agriculture workshop:
https://ngo.csd-i.org/wp-content/uploads/Elective-Courses/333/Enns-Chris-OL-344-Assignment-4.doc
The homework to turn in will be:
1. A short summary of what you did in the workshop and how it was received by the community members.
2. A few photographs of the workshop—the demonstrations—the attendees—and of yourself too.
3. A photograph of the notes that you may have taken on large sheets of paper during the workshop.
4. A short paragraph on what worked well and also of things that you might do differently next time.
Go to Magee’s Example Project Assignment Eight to see what this could look like.
Good luck at the workshop and enjoy yourself! Thanks for the past eight excellent weeks! I hope to see you in a future class soon.