How to teach community members to design a simple garden, dig beds and plant seeds in a workshop.
1. Introduction.
For many people living in the cycle of poverty, the idea of starting a kitchen garden might seem overwhelming. It could be the time investment, it might be perceived costs. It might be a lack of know-how: what to plant, how to plant and how to care for a garden. However, the positive benefits make it worthwhile enabling community members in gardening for nutrition.
| Martha Njoroge’s Family Garden Project in Kangema Kenya |
|
 |
Start small, think simple. The purpose of the first year’s garden is to give the participants a win—so that they will be encouraged to plant again the following year. Even if they plant only one bed, 1 meter by 4 meters, they should be able to get positive, delicious, nutritious results. |
2. Planning the Garden.
A garden must first be planned and designed. In the first year we won’t get into too much detail; let us not scare people away from the idea with too much information. During the course of the year we can gradually teach them more so that they can do a better job of planning for year two.
We need to plan for sun, exposure to wind and runoff, family size and food production, and crop choice for nutrition. Provide large sheets of paper for them to design an example garden. Ask participants to sketch the area around their house and begin thinking of a good location for their garden. Work with the family to make a decision: a single small bed the first year—or something bigger?
3. Looking at organic material samples collected from around the village.
Discuss the importance of organic matter for the soil and the beds. In the first year, since they may not have compost, let them know that they can begin by spreading whatever chopped-up organic material (OM) they can find on top of the staked out bed location. This can be leaves, manure, corn stalks, vegetable-based kitchen scraps. Organic material in garden soil provides nutrients, structure and facilitates holding water. Explain how many freely available types of OM are available around the village for a getting garden plot started. Have participants discuss other materials that they might be able to use.
4. Raised Beds.
They provide a soft environment for roots, they drain well, and the soil flora and fauna receive the oxygen they need. Soil is a living, breathing organism of sand, clay, organic matter, earthworms, nutrients, minerals, water and plant roots. It can suffer from being too wet, too dry and too sandy. Organic material and the soft soil of the raised beds are a benefit for root penetration, drainage, aeration, nutrient availability, and structure.
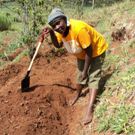
5. Taking turns laying out and digging a bed, mixing in organic material and smoothing the bed.
Stake out an area for a bed that is no wider than 1 meter; clear it of any vegetation or trash. Lay some organic material on top of the staked-out area. Beginning at one end of the new bed, dig a 1 meter long trench one shovel in depth and one shovel width wide. Place the soil to the side. With a garden fork or with the shovel, loosen the soil in the bottom of the trench a further shovel depth—but don’t remove it. Place some more organic material in the trench.
Dig a second trench alongside the first one, tossing the soil into the first trench. With the addition of the OM and the fluffing of the soil, the soil should now be higher than the surrounding terrain. Continue this process for the entire length of the bed. Place the soil from the first trench into the last trench.
Using a garden rake, and without walking on the new bed, carefully break up any clumps of soil and rake the surface of the new bed smooth, flat and level. Carefully rake the outer edges so that they slope at a 45-degree angle, and so that a small lip forms at the upper edge for holding water.
6. Laying out a seed grid and planting a few example seeds at the right distances and depths.
Nutritious plants should have already been selected and seeds obtained. The seeds should come with directions for correct spacing for planting and correct planting depths. Explain practical examples for seed spacing and planting depth: Crowding of plants, wasted space, seed size and shoot size vs. depth. Explain how to measure out and mark the beds for planting the seeds. Being sure not to walk on the new beds. Help them plant a few seeds by demonstrating making a row or a hole, planting and then covering the seed with soil. Show how to label the seed rows. Let the participants lay out the beds for the rest of the seeds.
7. Gently watering the newly planted seedbeds.
Use a watering can with a fine spray and gently water the newly planted seeds. Water slowly enough that the water can soak in and not form pools; pools can cause the seeds to float to the surface. Explain the best times of day to water, frequency, duration and quantity. Let the workshop participants take turns watering the newly planted seedbeds.
Put together a simple fence to protect the bed from animals. Be creative and use any free materials just to get going the first year. The fence could be made of branches, old tires, old barrels, or old pallets.
See a workshop Lesson Plan and How-to Card.
Learn more about international home gardens for nutrition:
Food Security, Nutrition and Starting Home Gardens